How to Screenshot with Logitech Keyboard
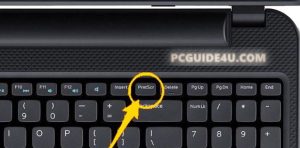
Taking a screenshot on a Logitech keyboard may seem straightforward, but it can involve a few twists and turns. First, you’ll need to locate the Windows key, which might be labeled as “Start” on some Logitech keyboards. Typically, you’ll find it near the Space key at the bottom of the keyboard. The PrintScreen key, which is essential for capturing your screen, can be located in various places depending on your keyboard model – often on the top-right, marked as PrintScreen, PrtSc, or PrtSc SysRq. If you can’t spot it, keep an eye out for a camera icon, which signifies the PrintScreen function.
To capture a screenshot, press the Windows/Start key and the PrintScreen key simultaneously, or FN + Windows/Start + F8 if they’re combined. In case these methods don’t work, Logitech’s G Hub application can be a handy alternative, allowing you to assign a shortcut key for taking screenshots. In macOS, capturing screens is more straightforward, requiring only key combinations like Command + Shift + 3 or Command + Shift + 4. And if none of these options work, Windows users can turn to the trusty Snipping Tool for screen captures. So, whether it’s Windows or macOS, Logitech keyboards offer versatile ways to capture those important moments on your computer screen. Happy screenshotting!
Locating the Windows Key
The first step in taking a screenshot on a Logitech keyboard in Windows is finding the Windows key, which is typically indicated by the familiar Windows icon. However, Logitech keyboards might label it as “Start.” You can usually locate this key at the bottom of the keyboard, near the Space key. If you’re using a keyboard that supports both Windows and macOS, the left Option key can serve as the Windows/Start key. Also, read about How Many Switches in a 75 Keyboard
Finding the PrintScreen Key
Next, you need to locate the PrintScreen key, which can be placed differently on Logitech keyboards. For full-sized or TenKeyLess models, you’ll often find the PrintScreen button on the top-right area of the keyboard, usually labelled as PrintScreen, PrtSc, or PrtSc SysRq.
If you can’t spot the PrintScreen key, look for a key with a camera icon on it. In Logitech keyboards, this camera icon often represents the PrintScreen function. The key with the camera icon can be placed in various locations, including among the function keys, backspace key, tab key, or around the right side of the keyboard. Discover more about Are AirPods Waterproof? Exploring Their Features
Taking the Screenshot
To capture a screenshot, press the Windows/Start key and the PrintScreen key simultaneously. If the PrintScreen function is combined with another key, such as a function key, you’ll need to press the FN key as well. For instance, if the PrintScreen icon is on the F8 key, you should press Fn + Windows/Start + F8. However, in some cases, just using Windows/Start + F8 will work if the Fn lock/media key is activated.
By default, Windows stores the screenshot image in C:\Users\*userprofile*\Pictures\Screenshots, where userprofile represents your Windows account.
Using Logitech G Hub (If Needed)
If the Windows + PrtScn combination doesn’t work on your Logitech keyboard, Logitech’s Companion application, Logitech G Hub, can come to the rescue. Here’s how to set it up:
Download and install Logitech G Hub.
Connect your Logitech keyboard and launch Logitech G Hub.
Select your keyboard from the list of devices.
Navigate to the Assignment tab (indicated by a plus [+] icon).
Click on “Commands.”
Look for the “Left Windows + Print Screen” shortcut key under Windows.
Drag this command and drop it onto any available button on the right side of the keyboard.
The selected button will now serve as a shortcut to take a screenshot.
Close the application and use the newly assigned screenshot button to capture your screen.

How to Screenshot on Logitech Keyboard in macOS
Taking screenshots on a Logitech keyboard in macOS is refreshingly simple. You don’t need to hunt for a PrintScreen key. Instead, use these key combinations:
Entire Screen: Press Command + Shift + 3 to capture the entire screen.
Selected Area: Press Command + Shift + 4 to capture a specific area.
Alternatives to Taking a Screenshot
If, for some reason, you can’t use the methods mentioned above, don’t worry; there are alternatives to capture your screen.
Snipping Tool (Windows)
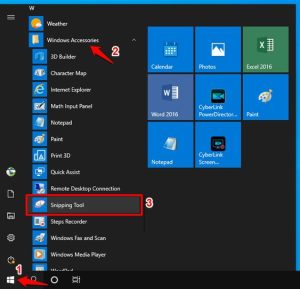
Windows users have access to a default screenshot application called the Snipping Tool. It provides flexibility in capturing either the entire screen or a specific portion. Here’s how to use it:
Press the Windows key and navigate to “All Apps.”
Find and select the Snipping Tool.
Click “New” and choose the area you want to capture.

Conclusion
Taking screenshots with Logitech keyboards may require a bit of adjustment, but with the right knowledge, you can easily master the process. Whether you’re using Windows or macOS, there’s a method that suits your needs. And if all else fails, the trusty Snipping Tool in Windows can save the day.
So, the next time you need to capture an important moment on your computer screen, you’ll be well-equipped to do so with your Logitech keyboard. Happy screenshotting!
FAQs
- How do I take a screenshot on my Logitech keyboard?
To take a screenshot on a Logitech keyboard in Windows, press the Windows/Start key and the PrintScreen key simultaneously. If they are combined with other keys, such as function keys, you may need to use the FN key as well. On macOS, you can use Command + Shift + 3 for a full-screen capture or Command + Shift + 4 to capture a specific area.
- What should I do if I can’t find the PrintScreen key on my Logitech keyboard?
If you can’t locate the PrintScreen key, look for a key with a camera icon on it. This key often represents the PrintScreen function in Logitech keyboards. It can be placed in various locations on the keyboard.
- How can I customise the screenshot shortcut on my Logitech keyboard?
You can customise the screenshot shortcut using Logitech’s Companion application, Logitech G Hub. Download and install G Hub, connect your keyboard, select it in the app, go to the Assignment tab, and configure the desired shortcut.
- Where are the screenshots saved when using the default Windows shortcut (Windows + PrtScn)?
By default, Windows saves screenshots in C:\Users\*userprofile*\Pictures\Screenshots, where userprofile represents your Windows account.
- Are there alternatives to taking screenshots with a Logitech keyboard?
Yes, if the Logitech keyboard shortcuts don’t work for you, Windows users can use the Snipping Tool, which allows you to capture specific portions of the screen.
